Cannelloni Recipe 2025:Ricotta and Spinach Step-by-Step Guide
Imagine a warm Italian kitchen filled with pasta’s aroma and sizzling sauce sounds. You’re about to make this scene in your home with our Ricotta Spinach Cannelloni recipe. It’s a classic dish that’s both elegant and comforting.
Cannelloni has been a favorite in Italian cuisine for generations. It’s known for its tender pasta, rich fillings, and savory sauces. Our spinach and ricotta filling adds a creamy, nutritious twist to this beloved dish. It’s great for family dinners or special occasions.
In this guide, you’ll learn to make this Italian pasta bake from scratch. You’ll get a deliciously authentic experience that will impress everyone.
Table of Contents
Key Takeaways
- Learn to prepare an authentic Ricotta Spinach Cannelloni recipe
- Discover the secrets to a creamy spinach and ricotta filling
- Master the art of layering your Italian pasta bake for a perfectly baked dish
- Enjoy a deliciously comforting meal that’s perfect for any occasion
- Impress your family and friends with your culinary skills
The History and Appeal of Ricotta Spinach Cannelloni
The history of cannelloni is as rich as its flavor. Ricotta spinach cannelloni, a dish loved around the world, comes from traditional Italian cooking. To grasp its appeal, we must look into its origins and why it remains popular.
Origins of Cannelloni in Italian Cuisine
Cannelloni, meaning « large tubes » in Italian, started in Sicilian cuisine. It was first filled with meat. But, over time, the ricotta and spinach filling became a favorite. This dish became a staple in Italian-American cuisine, loved for its comfort and taste. Italian cuisine’s adaptability shows in cannelloni’s evolution, with local ingredients and tastes.
| Region | Typical Filling | Cooking Method |
|---|---|---|
| Sicily | Meat | Baked |
| Italy (general) | Ricotta and Spinach | Baked |
| Italian-American | Ricotta and Spinach, Meat | Baked |
Why Ricotta and Spinach is a Classic Filling
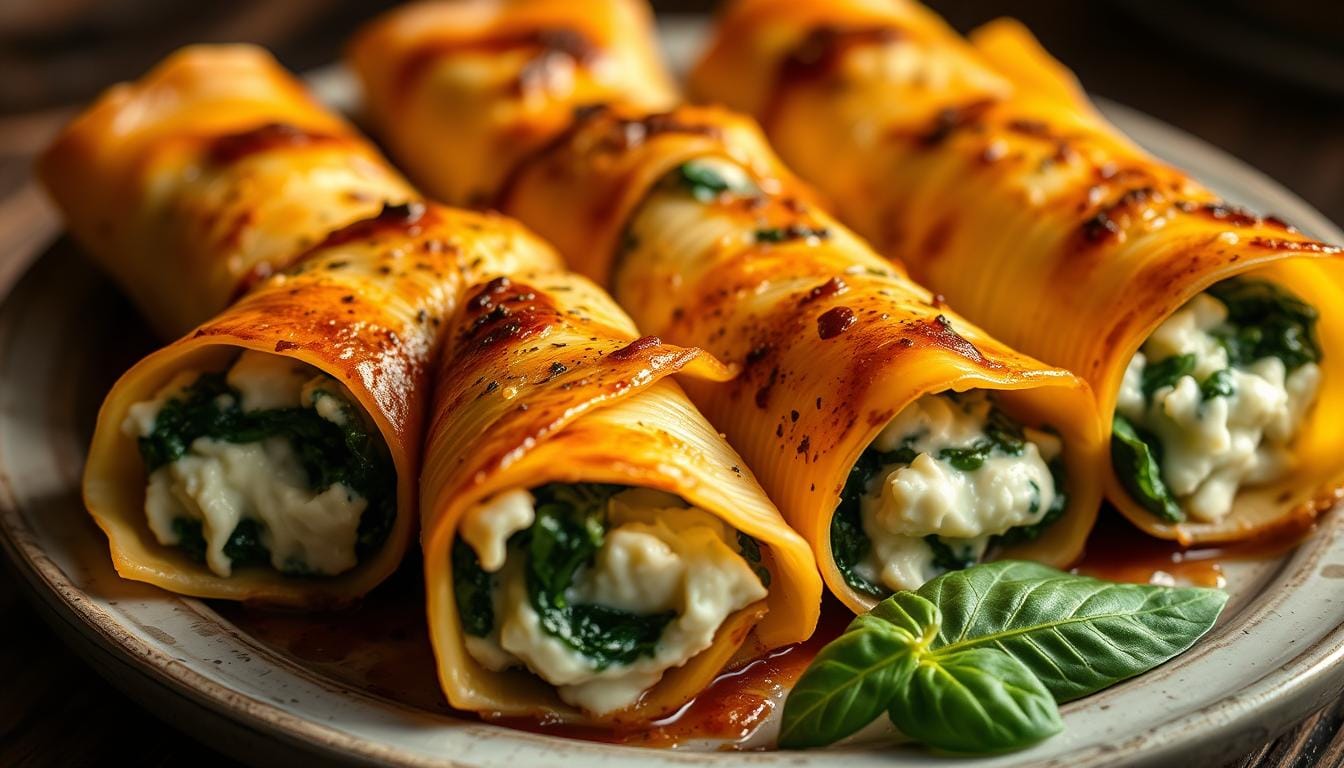
The mix of ricotta and spinach in cannelloni is a classic for good reasons. Ricotta’s creamy texture pairs well with spinach’s earthy taste. This filling is also lighter than meat, making it great for different tastes and diets. The ricotta and spinach filling is beloved for its taste and simplicity.
Essential Ingredients for Perfect Ricotta Spinach Cannelloni
Making great Ricotta Spinach Cannelloni starts with the right ingredients. The quality of your dish depends on what you choose. It’s important to know what to look for in each ingredient.
Selecting Quality Pasta Sheets
Choosing the right pasta sheets is key. You can use fresh or dried sheets. Fresh sheets are delicate and can be found in stores or made at home. Dried sheets are easier to store but need to be cooked well.
Look for sheets that are uniform in thickness and without tears or creases.
Choosing the Right Ricotta Cheese
Ricotta cheese is vital for your filling. Choose high-quality, whole-milk ricotta for the best taste and texture. Some ricottas are ‘low-moisture’ or ‘drained’ to avoid a wet filling.
Make sure your ricotta is fresh and stored well in the fridge.
Fresh vs. Frozen Spinach Considerations
Deciding between fresh vs. frozen spinach depends on convenience and season. Fresh spinach tastes brighter and is easier to prepare. But, it needs cleaning and chopping.
Frozen spinach is quicker and just as nutritious if it’s without added salt. If using frozen, squeeze out water to prevent a wet filling.
Additional Cheeses and Aromatics
Additional cheeses like Parmesan and mozzarella are important. Parmesan adds a salty flavor, while mozzarella makes the topping creamy. Adding aromatics like garlic, onion, and nutmeg deepens the filling’s taste.
These additional cheeses and aromatics will make your dish outstanding.
Kitchen Equipment You’ll Need
To make Cannelloni, you need specific kitchen tools. First, pick a good baking dish. It should hold your Cannelloni while it bakes perfectly.
Baking Dish Recommendations
A rectangular baking dish is best for Cannelloni. It helps with even layering and baking. Choose a dish big enough for all your pasta in one layer. A 9×13 inch dish works well, offering plenty of space.
Look for a dish with high sides. This is important for stacking multiple layers of pasta and sauce.
Useful Tools for Filling and Rolling
Filling and rolling Cannelloni needs special tools. You’ll need a piping bag or a large spoon for even filling. If using fresh pasta, a pasta rolling pin is handy, but not required for pre-made sheets.
Rolling the pasta needs a clean, dry surface. This prevents the pasta from sticking.
Optional Equipment for Homemade Pasta
For homemade pasta, you’ll need a pasta machine or a stand mixer with a pasta attachment. These tools ensure the right pasta texture. Making your pasta can make your Cannelloni even better.
Having the right kitchen tools makes cooking Cannelloni easier. The goal is to make the cooking process smooth and efficient.
Preparing the Ricotta and Spinach Filling
The heart of a great Cannelloni recipe is its filling. Here, ricotta and spinach blend in perfect harmony. You’ll need to prepare the spinach, mix it with ricotta and other cheeses, season it right, and get the consistency just right.
Properly Cleaning and Cooking Spinach
Before adding spinach to your ricotta filling, you must properly clean and cook it. Start by rinsing fresh spinach leaves under cold water to remove dirt. Then, blanch the spinach in boiling water for about 30 seconds until it’s wilted. Next, transfer the spinach to an ice bath to stop cooking.
Once cooled, squeeze out as much water as possible from the spinach. Use a cheesecloth or a fine-mesh strainer for this. This step is key to avoiding a watery filling.
Mixing the Perfect Cheese Blend
To make a rich and creamy filling, blend ricotta cheese with other cheeses. Start with high-quality ricotta and mix in grated Parmesan for saltiness and depth. For creaminess, add some mozzarella. Make sure the cheeses are well combined for a smooth texture.
Seasoning Tips for Maximum Flavor
Seasoning is key to enhancing your ricotta and spinach filling’s flavors. Add salt and pepper to taste. Consider adding nutmeg or a pinch of dried herbs like thyme or basil. Taste the filling as you go and adjust the seasoning. Remember, the filling will be baked, so it should be slightly under-seasoned to avoid being too salty.
Achieving the Ideal Filling Consistency
The filling’s consistency is crucial for your Cannelloni’s success. You want it to be creamy but not too runny. If it’s too thick, add a little milk or cream. If it’s too thin, add more ricotta or Parmesan cheese. The filling should hold its shape when piped or spooned into pasta tubes.
By following these steps, you’ll create a delicious and well-balanced ricotta and spinach filling. This will take your Cannelloni to the next level.
How to Make Ricotta Spinach Cannelloni: Assembly Process
To make ricotta spinach cannelloni, follow a simple assembly process. You need to prepare the pasta sheets, fill and roll the cannelloni, and arrange them in a baking dish. Let’s explore each step in detail.
Preparing the Pasta Sheets
Start by preparing the pasta sheets correctly. If using fresh pasta, make sure it’s at room temperature. For dried pasta, cook it until al dente, following the package instructions. Typically, boil the pasta sheets for 2-3 minutes until they’re slightly tender but still firm. Then, immediately submerge them in an ice bath to stop cooking. This helps keep the pasta’s texture and makes it easier to handle.
Filling and Rolling Techniques
Filling and rolling the cannelloni needs a gentle touch to avoid tears. Lay a pasta sheet flat and place a generous tablespoon of ricotta spinach filling at one edge, leaving a small border. Gently roll the pasta sheet into a tight cylinder, ensuring the filling is fully enclosed. Repeat with the remaining pasta sheets and filling. As you roll each cannelloni, place them seam-side down on a lightly floured surface to prevent sticking.
Arranging in the Baking Dish
After filling and rolling all your cannelloni, arrange them in the baking dish. Choose a dish large enough for all the cannelloni in a single layer. Spread a thin layer of your chosen sauce on the bottom of the dish to prevent sticking. Place the rolled cannelloni seam-side down in the dish, leaving a little space between each roll for even cooking. Continue layering the cannelloni and sauce until all ingredients are used, finishing with a layer of sauce on top.
By following these steps, you’ll have successfully assembled your ricotta spinach cannelloni, ready for baking to perfection.
Creating the Perfect Sauce for Your Cannelloni

The sauce is key to making your cannelloni special. It can turn a simple pasta dish into a masterpiece. The right sauce brings out the flavors of ricotta and spinach, adding depth.
Classic Tomato Sauce Recipe
A classic tomato sauce is perfect for cannelloni. It’s made with fresh tomatoes, garlic, and herbs. Start by sautéing garlic and onions in olive oil. Then add crushed tomatoes, salt, and herbs like basil or oregano.
Let the sauce simmer for at least 30 minutes. This lets the flavors mix well. You can use canned tomatoes if fresh ones are hard to find.
Tip: Adding a splash of red wine to your tomato sauce can make it taste richer.
Creamy Béchamel Sauce Option
For a creamier option, try béchamel sauce. It’s made by melting butter, whisking in flour, and adding milk. Season with nutmeg and salt to taste. This sauce adds a luxurious feel to your cannelloni.
Combining Sauces for Ultimate Flavor
Why pick just one sauce when you can mix them? Layering tomato and béchamel sauce gives a rich and complex flavor. Start with tomato sauce at the bottom, then add cannelloni, and top with béchamel. This combo is sure to wow.
Store-Bought Sauce Upgrades
Store-bought sauces can save time. But, you can make them better with a few tweaks. Add fresh herbs, garlic, or parmesan cheese for a personal touch. This way, you get a tasty dish without starting from scratch.
Baking Your Cannelloni to Perfection
To bake cannelloni perfectly, focus on a few key things. These include the right temperature and timing, knowing when it’s done, letting it rest, and solving any baking problems.
Optimal Temperature and Timing
First, preheat your oven to 375°F (190°C). The baking time varies based on cannelloni size and pasta type. It usually takes 25 to 35 minutes. Keep an eye on your dish to prevent overcooking.
Signs Your Cannelloni is Perfectly Cooked
So, how do you know when it’s done? The pasta should be al dente, the sauce bubbly and golden, and the cheese melted. If a knife slides in easily, it’s ready.
| Signs of Doneness | Description |
|---|---|
| Pasta | Al dente |
| Sauce | Bubbly and slightly golden brown |
| Cheese | Melted and creamy |
Resting Period Importance
After baking, let your cannelloni rest for 10 to 15 minutes. This step helps the flavors blend and the cheese set. Resist the temptation to dig in immediately for the best taste.
Troubleshooting Common Baking Issues
If your cannelloni isn’t right, check for common problems like overcooking or undercooking. If the top browns too fast, cover it with foil. Make sure your oven is at the right temperature, as this affects the baking.
Make-Ahead, Storage, and Reheating Tips

Planning a dinner party or a weeknight meal? Making cannelloni ahead of time is a smart move. It’s a favorite dish for many because of its flexibility. Preparing cannelloni early can save you from last-minute cooking stress.
Preparing Cannelloni in Advance
You can make your cannelloni up to a day before baking. Just follow the recipe, cover it tightly, and refrigerate. This lets the flavors mix, making the dish taste even better.
Freezing Instructions
Cannelloni can be frozen before or after baking. If you freeze before, assemble, cover, and freeze. Thaw it in the fridge overnight before baking. If you freeze after baking, cool it down, cover, and freeze. Reheat in the oven until it’s hot and bubbly.
Best Practices for Reheating
To reheat cannelloni, cover it with foil and bake at 350°F (175°C) until warm. The time needed depends on if it was refrigerated or frozen. Refrigerated cannelloni takes 20-25 minutes, while frozen takes 45-50 minutes or more.
| Storage Method | Reheating Time | Notes |
|---|---|---|
| Refrigerated | 20-25 minutes | Cover with foil |
| Frozen (unbaked) | 45-50 minutes | Thaw overnight, bake as directed |
| Frozen (baked) | 45-60 minutes | Cover with foil, reheat until hot and bubbly |
Serving Suggestions and Pairings
Make your Ricotta Spinach Cannelloni stand out with great serving ideas and pairings. It’s not just about putting the dish on the table. It’s about making a memorable experience for your guests.
Complementary Side Dishes
For a complete Italian meal, pair your Cannelloni with side dishes that complement it. Roasted vegetables like asparagus or bell peppers add a nice texture contrast. A simple green salad with a light vinaigrette is also a great choice.
Garlic bread or grilled ciabatta can make the meal more filling. These options add variety and depth to your dish.
Wine Pairing Recommendations
Choosing the right wine can elevate your Cannelloni. A dry white wine, such as Pinot Grigio or Vermentino, pairs well with the creamy filling. For red wine fans, a light-bodied Chianti or Dolcetto complements the flavors without overpowering them.
Garnishing for Presentation
Adding garnishes can make your Cannelloni look even better. Sprinkle some fresh parsley or basil leaves on top. A drizzle of extra virgin olive oil or a sprinkle of grated Parmesan cheese adds a nice touch.
Creating a Complete Italian Dinner Menu
To create a full Italian dinner, start with an antipasto course. Choose bruschetta or caprese salad. Then, serve your Ricotta Spinach Cannelloni as the main dish, with your favorite side dishes.
End the meal with a classic Italian dessert like Tiramisu or Gelato. This will leave a lasting impression on your guests.
By carefully choosing side dishes, wine pairings, and garnishes, you can make your Ricotta Spinach Cannelloni a special meal.
Conclusion: Mastering the Art of Homemade Cannelloni
By following this guide, you now know how to make ricotta and spinach cannelloni. This Italian classic is easy to make at home. The joy of making homemade cannelloni comes from the process, not just the taste.
Homemade cannelloni is a rewarding dish to make. It lets you explore the flavors of Italian cooking. With practice, you’ll get better at making it your way.
Now, it’s time to try out your new skills. Mix up the fillings, sauces, and how you present it. Cooking is all about the
journey, and making homemade cannelloni is a tasty adventure.
Source Links:
Lasagne Alle Verdure 22: A Delightful Vegetarian Dish
Laisser un commentaire